These are some basic routines I go over during a Proxmox VE install. Putting them down here so I won’t forget about them. Information might change with time.
Install
File System
During install you get to choose which file system you want to use. I’m going with a ZFS mirrored (RAID1) setup for Proxmox VE itself. Note that by saying Proxmox VE itself, I mean that VMs / Containers will run on other disks. Will touch on this later.
Why ZFS? Basically, it’s great. If you want to know more about it, check out -
- It’s Foss: What is ZFS? Why are People Crazy About it?
- Level1Linux@YouTube: What Is ZFS?: A Brief Primer
Why mirrored
- Losing one ssd on Proxmox is acceptable. I do not expect to lose both SSDs at the same time.
- RAIDZ needs at least 3 drives, while mirroring only needs 2.
- For workloads prioritizing IOPs, more VDEVs are preferred. Though this might not matter for Proxmox VE itself, it does matter for VMs and their pool, as will be discussed later.
ZFS settings during install
Read more here as well as references below.
ashift = 12
The ashift value of the pool defines the minimum block size of the pool. As I have drives with 4K physical sectors (see here), ashift = 12 corresponds to 4K sectors (2^12 = 4096). Even if you have a drive that uses 512 byte physical sectors, which is rare, using ashift = 12 is still fine. Note that once the ashift value is set for a pool, there is no going back unless you destroy the pool, which would mean reinstalling Proxmox VE. This is also why using ashift = 12 is recommended even for physical 512 byte sector drives, as if you add a 4K sector drive you will encounter performance issues.
However, if you have those rare 8K sector SSDs - set ashift = 13. See also on this topic: ArchWiki
compress = lz4
LZ4 does not tax on IO performance but still compresses. Simple as that.
checksum & copies
Leave as-is.
hdsize
Normally it should be left at default, as this will let ZFS use all the free space it can use. However, if you want to leave some space for partitioning later, you can set it here. For example, because of complications regarding swap on ZFS (you shouldn’t), leave some space to add a swap partition later.
Set it to a email address you own, as alerts will be sent here. This can be modified later.
Hostname
This can not be modified later.
After Install
Creating another zpool for VMs and Containers
Check if your pool is using entire disks - run zdb and find whole_disk.
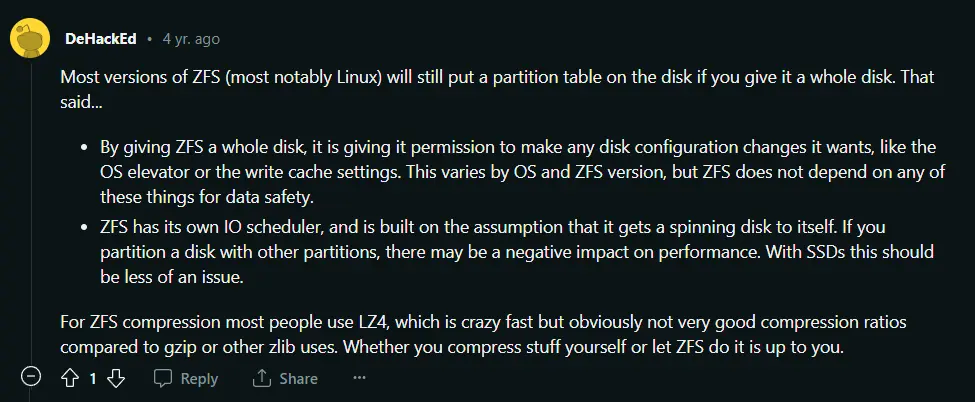
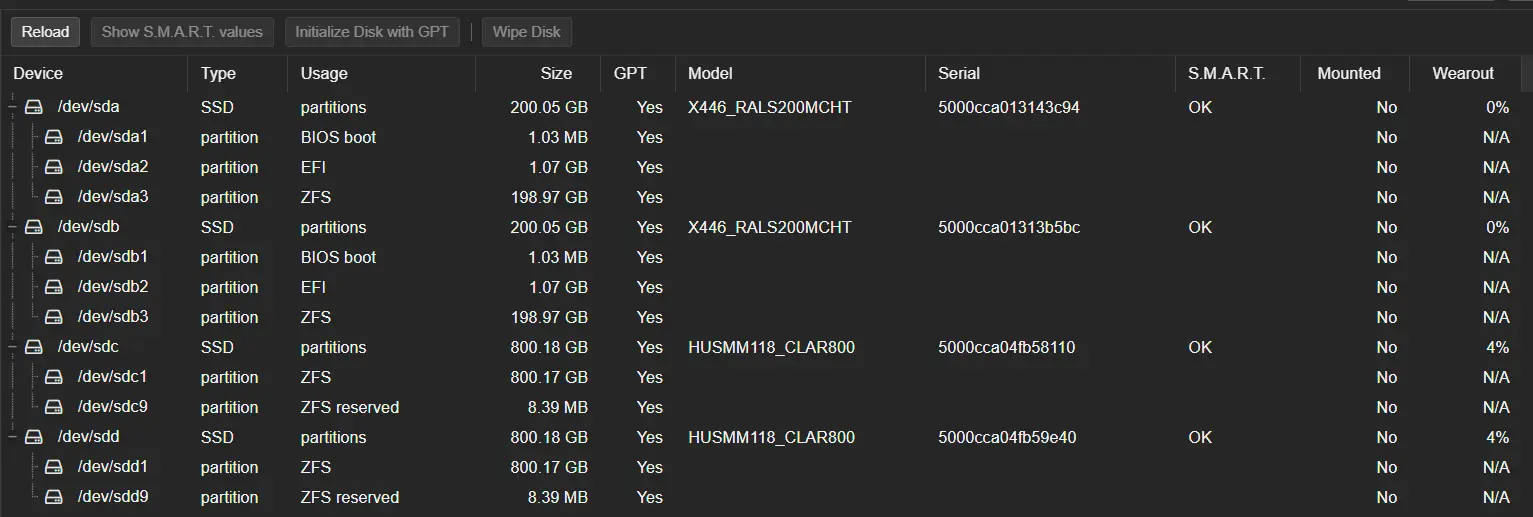
It is recommended to point ZFS at an entire disk (ie. /dev/sdx rather than /dev/sdx1), which will automatically create a GPT (GUID Partition Table) and add an 8 MB reserved partition at the end of the disk for legacy bootloaders. Source: ArchWiki There is also a reason regarding IO, however I was unable to find documentation sources for this. Source: Reddit

Also, I don’t like the look of having boot & EFI & ZFS partitions on a single disk, so I would rather have dedicated disks for storage.

I use mirrored setups for this - not RAIDZ. Reasons have been listed above.
ZFS trim and scrub
This is actually already enabled by default.
root@ayanami:~# cat /etc/cron.d/zfsutils-linux
PATH=/usr/local/sbin:/usr/local/bin:/sbin:/bin:/usr/sbin:/usr/bin

# TRIM the first Sunday of every month.
24 0 1-7 * * root if [ $(date +\%w) -eq 0 ] && [ -x /usr/lib/zfs-linux/trim ]; then /usr/lib/zfs-linux/trim; fi

# Scrub the second Sunday of every month.
24 0 8-14 * * root if [ $(date +\%w) -eq 0 ] && [ -x /usr/lib/zfs-linux/scrub ]; then /usr/lib/zfs-linux/scrub; fi
Postfix settings so alert emails won’t go to spam
I have my own email server with mailcow. If you use a different server / provider, your settings may vary.
Set email from address
Go to Datacenter -> Options -> “Email from address”. Enter your email from address here.
Get prerequisites
apt-get install libsasl2-modules
main.cf
nano /etc/postfix/main.cf
Comment out the relayhost = line.
Add the following at the end.
relayhost = mail.relay.host:587
smtp_use_tls = yes
smtp_sasl_auth_enable = yes
smtp_sasl_password_maps = hash:/etc/postfix/sasl_passwd
smtp_sasl_security_options = noanonymous
smtp_sasl_tls_security_options = noanonymous
smtp_tls_security_level = encrypt
sasl_passwd
echo "mail.relay.host [email protected]:YourAppPassword" > /etc/postfix/sasl_passwd
chmod 600 /etc/postfix/sasl_passwd
postmap /etc/postfix/sasl_passwd
postfix reload
Send testmail
mail -s Testmail [email protected]
Testmail
.
Check mail queue
root@ayanami:~# mailq
Mail queue is empty
Troubleshooting
If you have errors like -
root@proxmox:~# mailq
-Queue ID-  --Size-- ----Arrival Time---- -Sender/Recipient-------
43B2E100F17    1399 Mon Nov  1 18:36:56  [email protected]
(SASL authentication failed; cannot authenticate to server smtp.sendgrid.net[13.114.210.107]: no mechanism available)
Then you might have messed up the following -
- apt-get install libsasl2-modules
- postmap /etc/postfix/sasl_passwd
- Wrong account / password
Use postqueue -f to retry the queue.
System and ZFS alerts
If you have your correct email set at installation, you have nothing else to worry about. All alerts will be sent to root@proxmox, and then forwarded to the set email address.
If you need to fix it, you can find it at Datacenter -> Permissions -> Users -> root -> E-Mail.
To test them out, just pull your drives out and wait for a email alert to arrive.
Enable PCI-E passthrough
Make your modifications using the commmand line.
Follow these guides:
- ServeTheHome: How to Pass-through PCIe NICs with Proxmox VE on Intel and AMD
- Proxmox Documentation: PCI(e) Passthrough
- Proxmox Documentation: PCI Passthrough
Disable Conntrack for asymmetrical routes
Create / modify /etc/pve/nodes/<nodename>/host.fw and add the following:
[OPTIONS]
nf_conntrack_allow_invalid: 1
Then restart the Proxmox VE firewall.
pve-firewall stop && pve-firewall start
Source: blog.swineson.me
References & Sources
- Proxmoxのpostfixを設定する
- Techno Tim: Set up alerts in Proxmox before it’s too late!
- ServeTheHome: Proxmox VE E-mail Notifications are Important
- Reddit: Proxmox with ZFS + SSDs: Built-in TRIM cron job vs zfs autotrim?
- Proxmox Forum: ZFS TRIM on Proxmox
- Reddit: Formatting ZFS to use whole disk vs. partition?
- ZANSHIN DOJO: Proxmox ZFS Performance Tuning
- Proxmox Documentation: ZFS on Linux
- Proxmox Documentation: ZFS: Tips and Tricks
- Proxmox Documentation: Advanced ZFS Configuration Options
- It’s Foss: What is ZFS? Why are People Crazy About it?
- high-availability.com: ZFS Tuning and Optimisation
- ArchWiki: ZFS
- Level1Linux@YouTube: What Is ZFS?: A Brief Primer
- Techno Tim@YouTube: Set up alerts in Proxmox before it’s too late!
- ServeTheHome: How to Pass-through PCIe NICs with Proxmox VE on Intel and AMD
- Proxmox Documentation: PCI(e) Passthrough
- Proxmox Documentation: PCI Passthrough
- blog.swineson.me: Proxmox VE中虚拟机非对等路由出站数据包被丢的情况分析
最后修改于 2023-09-18